
Chicken Enchiladas

Comforting baked tortillas filled with tender shredded chicken, melty Monterey Jack cheese, and bright cilantro. A weeknight favorite that comes together quickly.
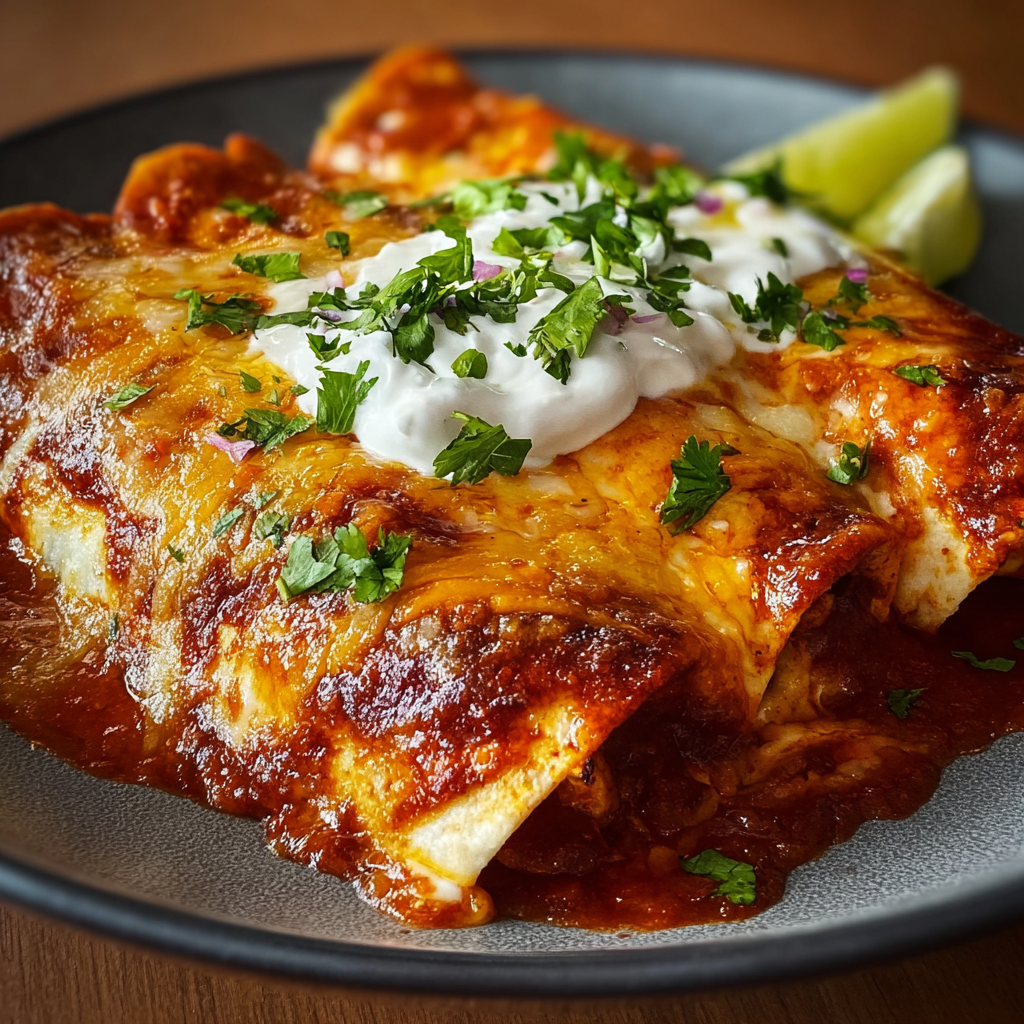
This recipe for chicken enchiladas has been on heavy rotation at my house for years and it started as a way to use leftover roasted chicken and a couple of pantry staples. I first made these on a busy week night after picking up a rotisserie bird at the market. The combination of warm red sauce, shredded chicken and melted Monterey Jack felt like an instant family pleaser. Texture is important here, and the contrast between the soft tortillas and the slightly crisped edges once baked makes every bite satisfying.
I discovered a few technique details that transformed the outcome. Warming the tortillas briefly keeps them pliable and prevents splitting during rolling. Sautéing the onion and garlic first adds a base of flavor that lifts a simple filling into something memorable. These enchiladas are forgiving, which makes them perfect for cooks who want big flavor without fuss. They work for casual dinners, feeding a crowd, and they are easy to scale up when hungry guests arrive.
Why You'll Love This Recipe
- This meal is ready in roughly 40 minutes from start to finish, making it ideal for week nights when time is short but you want comfort on the table.
- The filling uses cooked shredded chicken so you can grab a rotisserie bird for convenience, or use leftovers from Sunday dinner and save time.
- Monterey Jack cheese melts beautifully and creates a creamy interior that pairs with zesty red enchilada sauce for well balanced flavor.
- It relies mostly on pantry staples like canned enchilada sauce, spices and flour tortillas so you can make it without a special grocery run.
- Make ahead friendly, because you can assemble it, chill or freeze it, then bake when you are ready which is great for meal planning.
- Flexible to dietary tweaks, for example swap to corn tortillas for a more traditional approach or use a lower fat cheese for a lighter plate.
From my experience, guests always ask for seconds and leftovers reheat well which makes this a reliable crowd pleaser. My kids call it the dinner that makes the house smell like fiesta, and I love that little ritual of passing the baking dish around the table.
Ingredients
- Cooked shredded chicken 2 cups: Use rotisserie chicken for convenience or roast chicken the night before. Look for white meat if you prefer milder flavor and shred coarsely so it mixes well with the filling.
- Red enchilada sauce 1 can 10 oz: Choose mild or spicy to match your heat tolerance. I like a medium heat that complements the cheese without overpowering the chicken.
- Monterey Jack cheese 2 cups shredded: Buy a block and shred it yourself for the best melt. Pre shredded cheese contains anti caking agents that can change melting behavior.
- Flour tortillas 8 pieces: Soft flexible tortillas work best to avoid tearing while rolling. Warm them briefly before filling for easy rolling.
- Vegetable oil 1 tablespoon: Neutral oil is perfect for sautéing vegetables and blooming spices.
- Onion 1 small chopped: Yellow or white onion both work, and sautéing until soft adds sweetness to the filling.
- Garlic 2 cloves minced: Fresh garlic brings aroma and depth. Add near the end of sautéing so it does not bitterly brown.
- Cumin 1 teaspoon: Adds warm earthy notes that pair well with chili powder.
- Chili powder 1 teaspoon: Use your favorite brand to add color and a gentle kick.
- Salt and pepper to taste: Season gradually and adjust after combining with sauce and cheese.
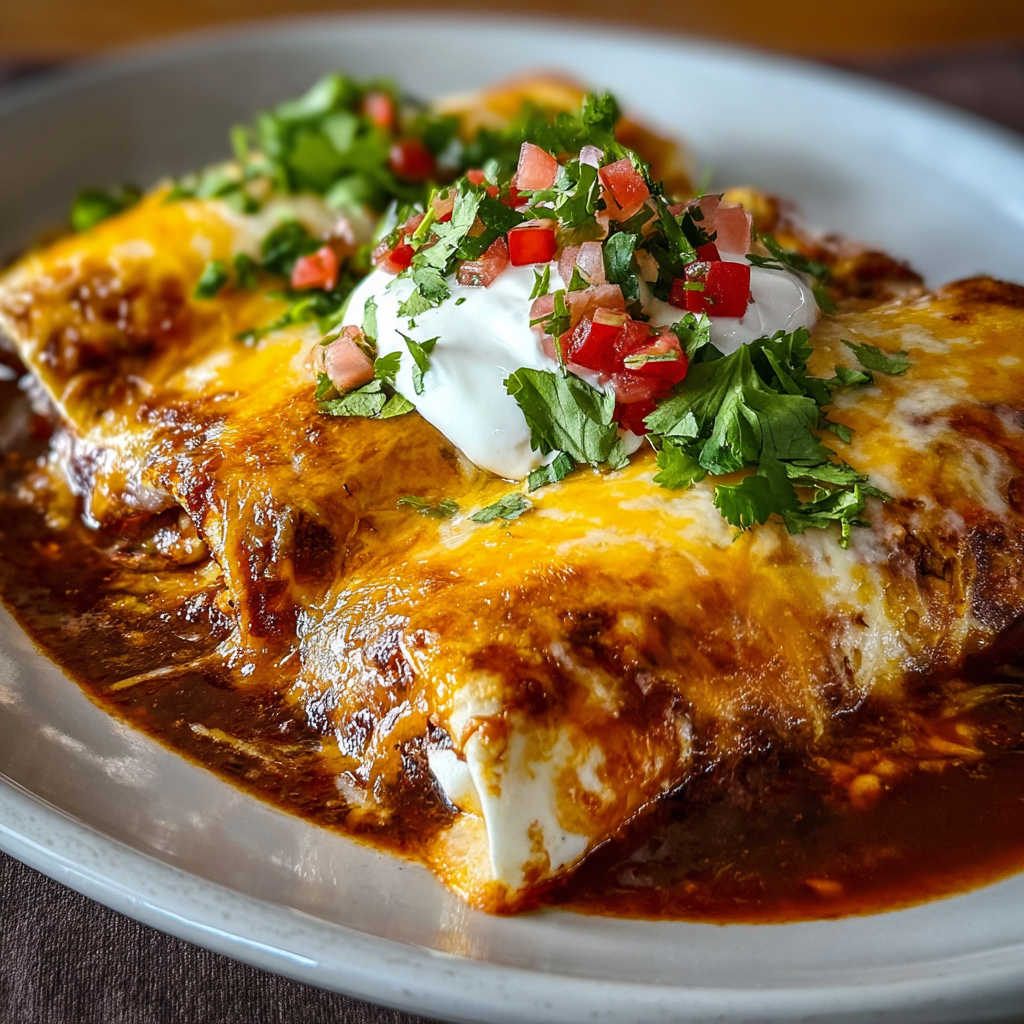
- Chopped cilantro for garnish: Adds brightness and a fresh finish when sprinkled on top just before serving.
- Sour cream for serving: Provides creaminess and tang, serve on the side so each person can add their preferred amount.
Instructions
Prep the chicken and ingredients: Shred two cups of cooked chicken into bite sized pieces and set aside. Chop the onion finely and mince garlic. Pre measure spices and shred the cheese so everything is ready to go and the assembly moves quickly. Sauté aromatics and spices: Heat 1 tablespoon of vegetable oil in a skillet over medium heat. Add the chopped onion and cook until translucent about 4 to 5 minutes, stirring occasionally. Add the minced garlic, 1 teaspoon of cumin and 1 teaspoon of chili powder, and cook for 30 to 45 seconds until fragrant. Watch closely because garlic burns fast. Combine filling components: Move the skillet off the heat briefly then stir in the shredded chicken. Add about half a cup of the enchilada sauce to moisten the mixture and fold in one cup of shredded cheese. Season with salt and pepper to taste. The filling should be moist and flavorful but not runny. Warm tortillas: Warm each tortilla for 10 to 15 seconds in the microwave covered with a damp paper towel or heat briefly in a dry skillet so they are pliable. This step prevents splitting while rolling and helps them absorb the sauce slightly. Assemble the enchiladas: Spread 1/2 cup of enchilada sauce evenly on the bottom of a 9 by 13 inch baking dish. Place about 1/4 to 1/3 cup of the chicken filling in the center of each tortilla, roll tightly and place seam side down in the baking dish. Continue until all eight are in the dish. Top and bake: Spoon the remaining enchilada sauce evenly over the rolled tortillas and sprinkle the remaining shredded cheese over the top. Bake in a preheated oven at 375 degrees Fahrenheit for 15 to 20 minutes or until the cheese is melted and bubbling and the edges show light browning. Rest and garnish: Let the enchiladas rest for 5 minutes out of the oven so the sauce settles. Sprinkle chopped cilantro and serve family style with sour cream on the side.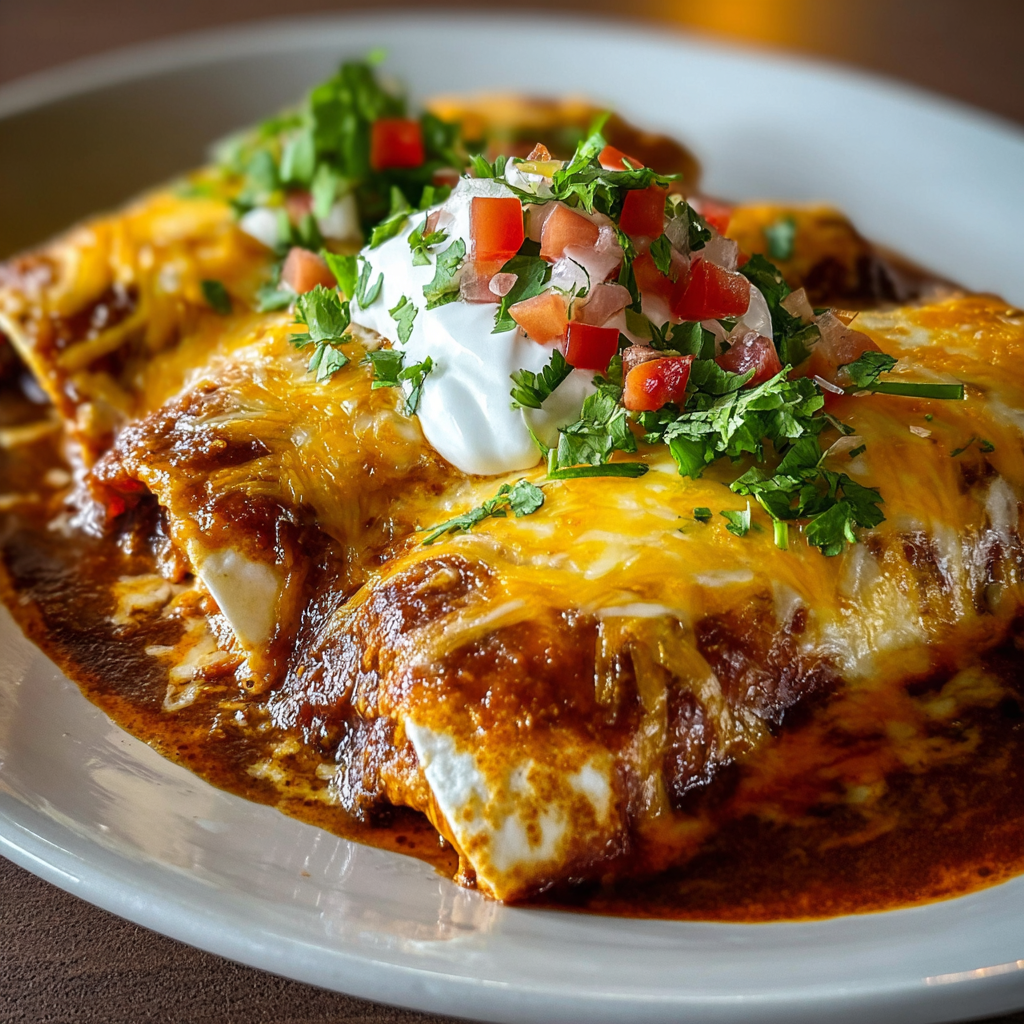
You Must Know
- These enchiladas freeze well for up to three months when wrapped tightly. Thaw overnight in the refrigerator before baking for best texture.
- Leftovers stored in an airtight container will keep in the refrigerator for three days and reheat in the oven at 350 degrees Fahrenheit until warmed through.
- They are a good source of protein because of the chicken and cheese, and they can be lightened by using reduced fat cheese and low fat sour cream.
- To avoid soggy tortillas do not over sauce the filling. Apply most of the sauce on the top and keep the interior moist but not wet.
- Adjust the heat by choosing mild enchilada sauce or adding a pinch of cayenne to the filling if you want more spice.
My favorite aspect is how forgiving the process is. I once assembled the whole pan, froze it, and later baked it for house guests who arrived unexpectedly. They declared it restaurant worthy and asked for the recipe. Small techniques like warming the tortillas and sautéing the aromatics make a big difference in flavor and texture.
Storage Tips
Cool the tray to room temperature before refrigerating to avoid condensation. Store in a shallow airtight container or cover the baking dish tightly with foil. In the fridge they stay great for three days. For freezing wrap each enchilada individually in plastic wrap and then place them in a freezer safe bag for up to three months. Reheat from frozen by baking at 375 degrees Fahrenheit for 25 to 30 minutes covered with foil then remove foil for 5 minutes to crisp the top.
Ingredient Substitutions
If you prefer corn tortillas use eight 6 inch corn tortillas warmed and dipped briefly in sauce to prevent cracking. Swap Monterey Jack for a blend of cheddar and mozzarella for a sharper flavor and stretchy melt. For a lighter version use shredded rotisserie turkey or poached chicken breast and reduce the cheese by half. To make it gluten free choose certified gluten free tortillas and verify the enchilada sauce ingredients on the label.
Serving Suggestions
Serve with a dollop of sour cream, lime wedges and a scatter of freshly chopped cilantro. A simple side of Mexican rice and black beans rounds out the meal. For a bright contrast try a crisp cabbage slaw dressed with lime and a touch of honey. For gatherings place the baking dish in the center and offer chopped jalapeños, sliced avocado and extra sauce so guests can customize their plates.
Cultural Background
Enchiladas originated in Mexico as a practical way to use tortillas and leftover ingredients. The dish evolved regionally and today has many variations from simple corn tortilla rolls filled with beans to more elaborate versions with complex moles. The version here reflects American home kitchen influences using flour tortillas and store bought enchilada sauce for speed while keeping the essential idea of rolled filled tortillas bathed in a chili based sauce.
Seasonal Adaptations
In summer add grilled corn and diced tomatoes to the filling for freshness. In winter swap cilantro for chopped flat leaf parsley if cilantro is not available and add a pinch of smoked paprika for warmth. For holiday gatherings scale the dish up and bake in multiple pans. Try topping with roasted poblanos in the fall for a deeper smoky character.
Success Stories
Readers often tell me they make this for potlucks and that it disappears fast. One friend said the leftovers were even better because the flavors meld overnight. My neighbor served it once at a casual dinner party and later requested the recipe because it felt familiar yet elevated. The key feedback I hear is that it tastes like a special home meal but takes less time than expected.
Meal Prep Tips
Assemble enchiladas into the baking dish and cover with plastic wrap for up to 24 hours in the refrigerator. If freezing, assemble and flash freeze on a sheet pan then transfer to a freezer bag. Label with date and cook from frozen by increasing bake time. Use glass or metal pans for even heating and divide into portions in meal prep containers for easy reheating.
There is joy in sharing simple food made with care. These enchiladas are comfort food that lends itself to shortcut friendly prep and family style serving. Try the small technique changes suggested here and make them your own.
Pro Tips
Warm tortillas briefly before rolling to prevent tearing and reduce cracking during assembly.
Sauté the onion until translucent before adding garlic to avoid burnt garlic flavor.
Assemble the dish slightly under sauced inside and add most sauce on top to avoid soggy centers.
Freeze assembled enchiladas on a sheet pan first if you plan to store individual portions for easier handling.
This nourishing chicken enchiladas recipe is sure to be a staple in your kitchen. Enjoy every moist, high protein slice — it is perfect for breakfast or as a wholesome snack any time.
Tags
Chicken Enchiladas
This Chicken Enchiladas recipe makes perfectly juicy, tender, and flavorful steak every time! Serve with potatoes and a side salad for an unforgettable dinner in under 30 minutes.
Ingredients
Filling
Sauce and Cheese
Wraps and Garnish
Cooking
Instructions
Prepare ingredients
Shred two cups of cooked chicken and measure all ingredients. Chop onion, mince garlic and shred the cheese so assembly is efficient.
Sauté aromatics
Heat 1 tablespoon vegetable oil in a skillet over medium heat. Cook the chopped onion until translucent about 4 to 5 minutes then add garlic and spices and cook briefly until fragrant.
Mix filling
Remove the skillet from heat and stir in shredded chicken, half a cup of enchilada sauce and one cup of shredded cheese. Adjust seasoning with salt and pepper.
Warm tortillas
Warm tortillas in the microwave covered with a damp cloth for 10 to 15 seconds or in a dry skillet for a few seconds on each side so they are pliable.
Assemble enchiladas
Spread 1/2 cup of enchilada sauce on the bottom of a 9 by 13 inch dish. Place filling in each tortilla, roll seam side down and arrange in the dish.
Top and bake
Pour remaining sauce over the rolled tortillas, sprinkle with remaining cheese and bake at 375 degrees Fahrenheit for 15 to 20 minutes until bubbling and lightly browned.
Rest and serve
Allow to rest 5 minutes before serving. Garnish with chopped cilantro and serve with sour cream and lime wedges.
Last Step: Please leave a rating and comment letting us know how you liked this recipe! This helps our business to thrive and continue providing free, high-quality recipes for you.
Nutrition
Did You Make This?
Leave a comment & rating below or tag
@yummyhues on social media!
Categories:
You might also like...
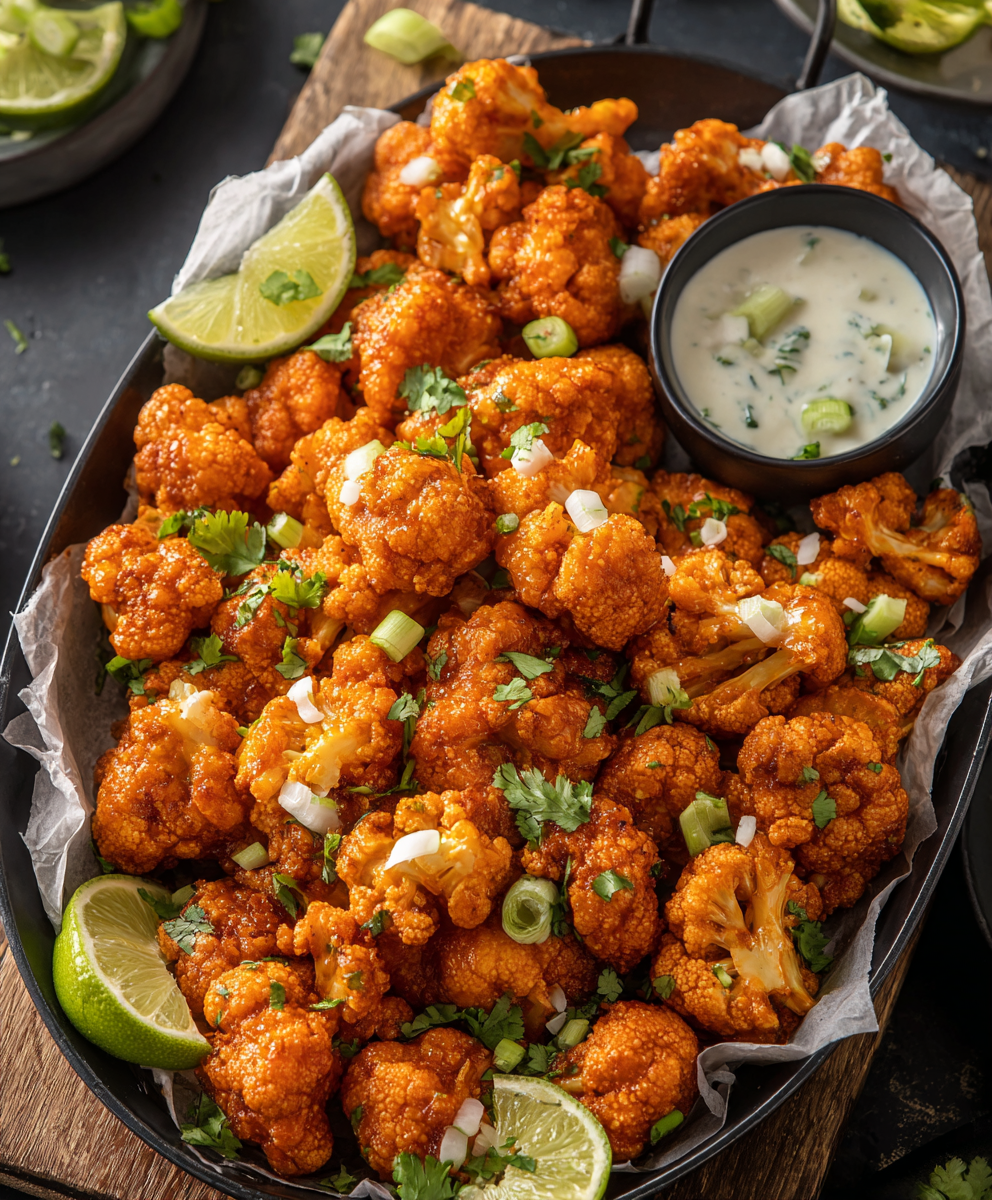
Air-Fried Rice Paper Noodle Rolls
Light, crisp rice paper rolls filled with vermicelli, tofu or shrimp and vibrant vegetables—air-fried to golden perfection for a healthy, speedy snack or appetizer.
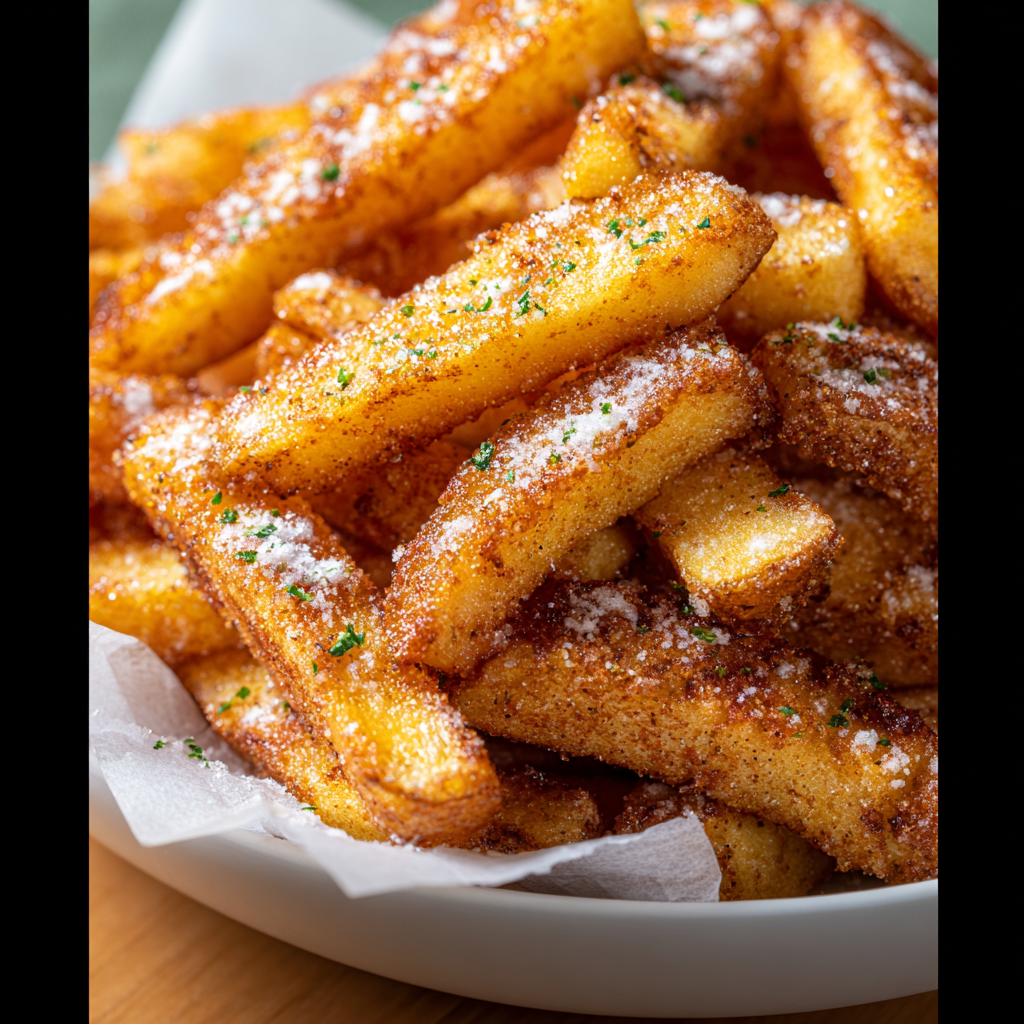
Air Fryer Apple Fries
Crispy, lightly sweet apple sticks coated in panko and cinnamon, ready in minutes from the air fryer. A simple, family friendly snack or dessert.
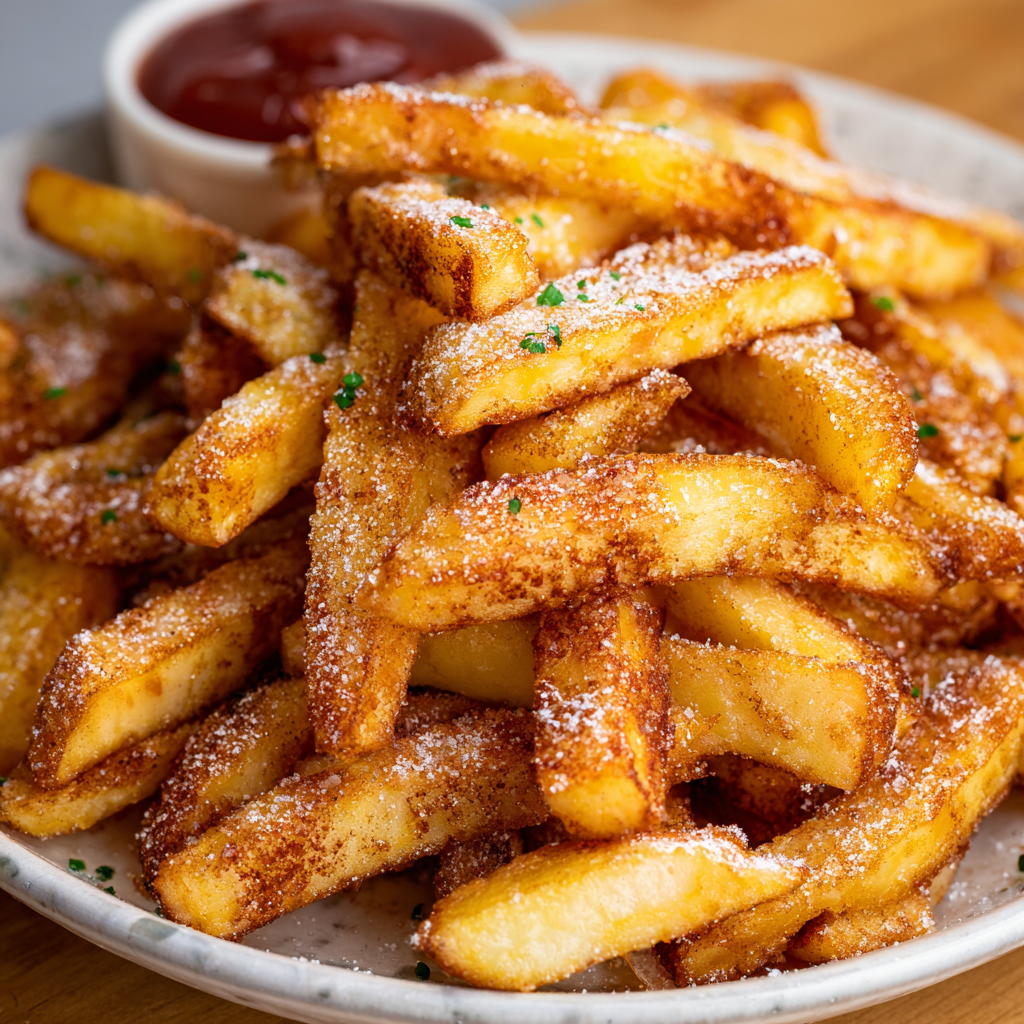
Air Fryer Apple Fries
Crispy, cinnamon-kissed apple sticks air-fried to golden perfection — a quick snack that tastes like dessert, but feels delightfully fresh.
Did You Make This?
Leave a comment & rating below or tag @yummyhues on social media!
Rate This Recipe
Share This Recipe
Enjoyed this recipe? Share it with friends and family, and don't forget to leave a review!
Comments (1)
This recipe looks amazing! Can't wait to try it.
Comments are stored locally in your browser. Server comments are displayed alongside your local comments.
Hi, I'm Chloe!
What's Popular
30-Minute Meals!
Join to receive our email series which contains a round-up of some of our quick and easy family favorite recipes.