
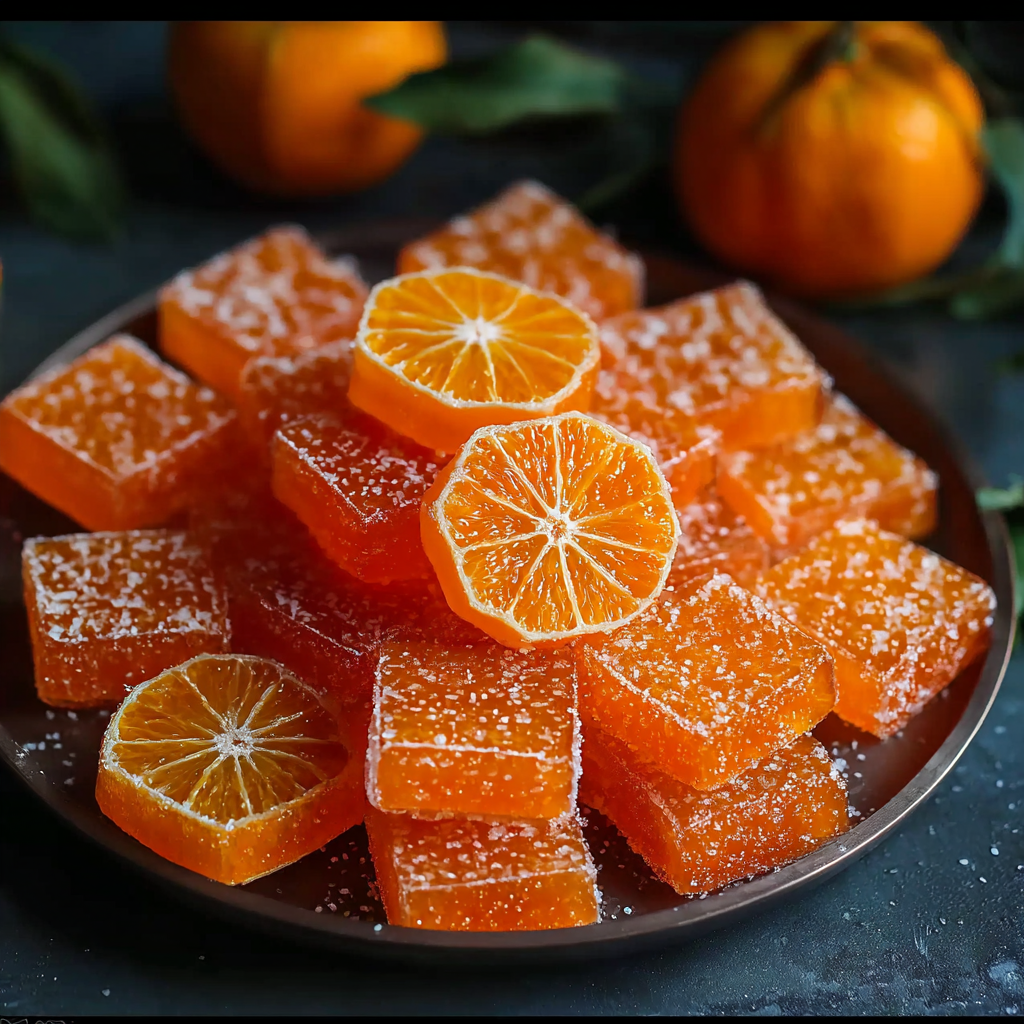
Classic Homemade Orange Candy

Bright, chewy candied orange slices made from fresh oranges or tangelos, simmered in a simple syrup until translucent and dried to a tender, sweet finish — optional sugar dusting or chocolate dip for a decadent touch.
This classic homemade orange candy has been a small ritual in our kitchen for years. I first learned the method on a lazy winter afternoon when citrus was at its peak, and the bright, fragrant aroma of simmering orange slices filled the house. The process is deceptively simple: thin, even rounds of orange are simmered gently in a clear syrup until the peel becomes translucent and tender, then left to dry until they set into a chewy, glossy treat. I remember sharing the first batch with neighbors; they returned the plate empty and asked for the recipe immediately.
What makes this preparation special is the way the peel transforms. The pith softens rather than becoming bitter, and the thin rind keeps a pleasant chew that balances the syrupy sweetness. These slices are versatile: eaten on their own with tea, rolled in fine sugar for a frosted finish, or dipped in dark chocolate for a holiday confection. I use small oranges or tangelos because their thin skins yield more tender pieces and produce about 18 to 20 uniform slices per 3 fruit batch. This method is forgiving, approachable for beginners, and elegant enough to gift during the holidays.
Why You'll Love This Recipe
- Made with only three core ingredients — fresh oranges, granulated sugar, and water — making it affordable and pantry-friendly while delivering bright citrus flavor and glossy presentation.
- Hands-off simmering and passive drying mean active time is minimal; you can multitask while the fruit transforms, and it’s perfect for weekend projects.
- Flexible finish options: roll in extra sugar for a frosted look, dip half in melted dark chocolate for contrast, or sprinkle flaky salt for a modern sweet-salty hit.
- Great for gifting and plating: the slices look beautiful in cellophane or on a dessert board, and they store well for sharing at parties or on seasonal plates.
- Beginner-friendly technique that teaches syrup management, gentle simmering, and how to judge translucence — skills transferable to other candying tasks.
Our family’s reaction is always the best endorsement: the kids call them orange lollies, while adults appreciate the concentrated citrus and chewy texture. Over the years I’ve adjusted simmer times and slice thickness to suit preferences; my mother prefers slightly shorter simmering for a chewier bite, while I like them fully translucent for the glossy look. These little adjustments are simple to make and allow you to personalize texture and sweetness.
Ingredients
- Small oranges or tangelos (3): Choose firm, thin-skinned fruit for the most tender peels. I prefer easy-peel varieties like tangerines or small navel oranges; avoid overly thick-rinded varieties.
- Granulated sugar (3 cups): Standard white sugar yields a clear, stable syrup. Use supermarket brands such as Domino or C&H for consistent results; caster sugar will work but is not necessary.
- Water (3 cups): Use filtered or cold tap water to make a simple syrup. Equal parts sugar and water create a 1:1 syrup that balances flavor without crystallizing quickly.
- Optional: powdered sugar or extra granulated sugar: For a frosted finish, roll slices in sugar once tacky. Powdered sugar gives a different texture but granulated is traditional.
- Optional: dark chocolate (2–3 ounces) and flaky sea salt: Melt bittersweet chocolate to dip half the slices for an elegant finishing touch; flaky salt lifts the flavors when sprinkled sparingly.
Instructions
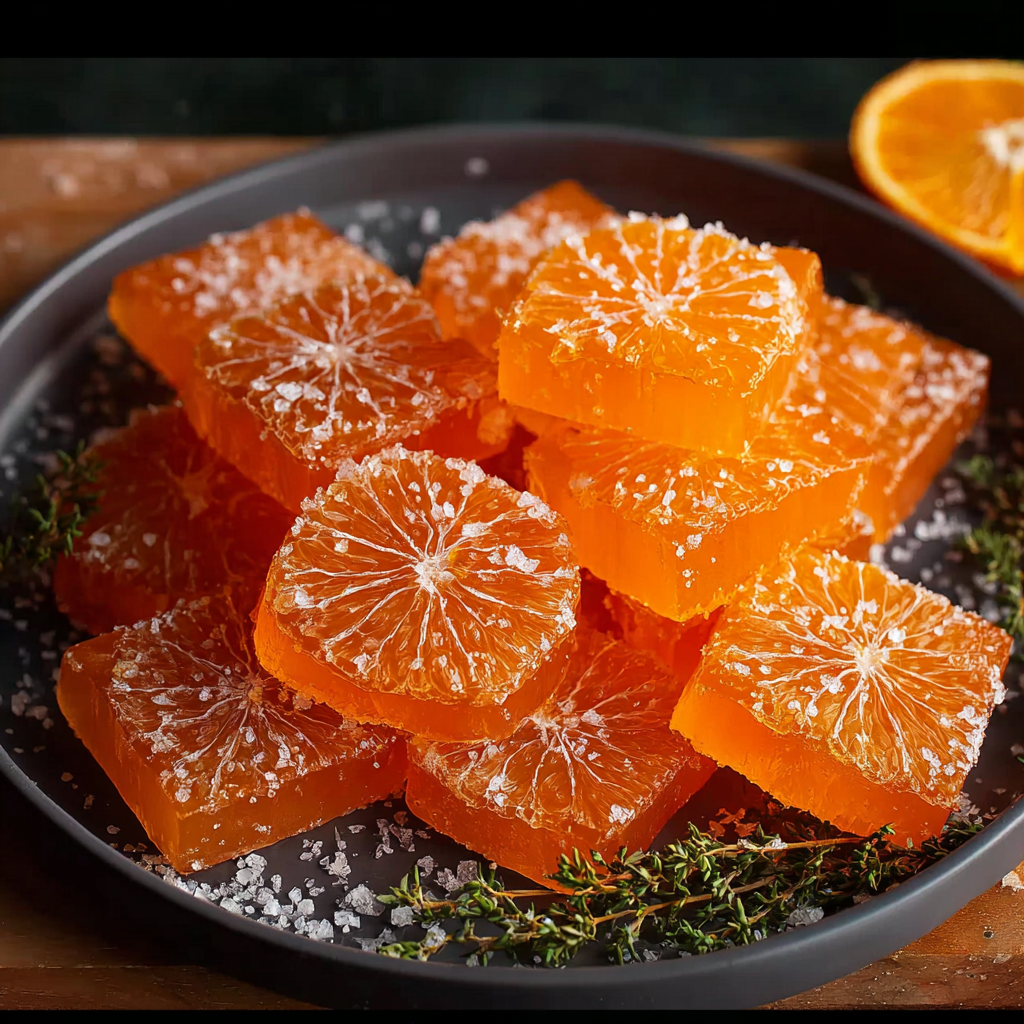
Slice the fruit: Using a sharp knife or mandoline, slice the oranges into 1/4-inch rounds. Aim for uniform thickness so they cook evenly; discard end pieces or reserve them for marmalade. Thin, consistent slices ensure the peel becomes translucent at the same time as the flesh. Make the syrup: In a medium saucepan, combine 3 cups granulated sugar and 3 cups water. Heat over medium, stirring until the sugar dissolves and the mixture comes to a gentle boil. Bring to a brief rolling boil to ensure a clear syrup, then immediately reduce to a low simmer to avoid rapid bubbling that can break delicate slices. Simmer the slices: Reduce heat so the syrup is at a bare simmer. Add the orange rounds in a single layer; they may need to be cooked in batches. Simmer gently for 45 to 60 minutes, turning occasionally with tongs so both sides candy evenly. Look for the peel to become translucent and the flesh to appear glossy; this is the key visual cue that the citrus has absorbed enough syrup. Drain and dry: Using tongs or a slotted spoon, remove the slices and transfer them to a wire rack set over a baking sheet. Arrange slices so air circulates and let them dry uncovered at room temperature for 24 to 48 hours, until the surface is tacky but set to the touch. Shorter drying yields stickier candy; longer drying firms them more. Finish and store: When tacky, you can roll slices in extra granulated sugar for a frosted edge, or dip half in melted dark chocolate and sprinkle with flaky salt. Store in a single layer in an airtight container lined with parchment at room temperature for up to two weeks, or refrigerate for longer keeping.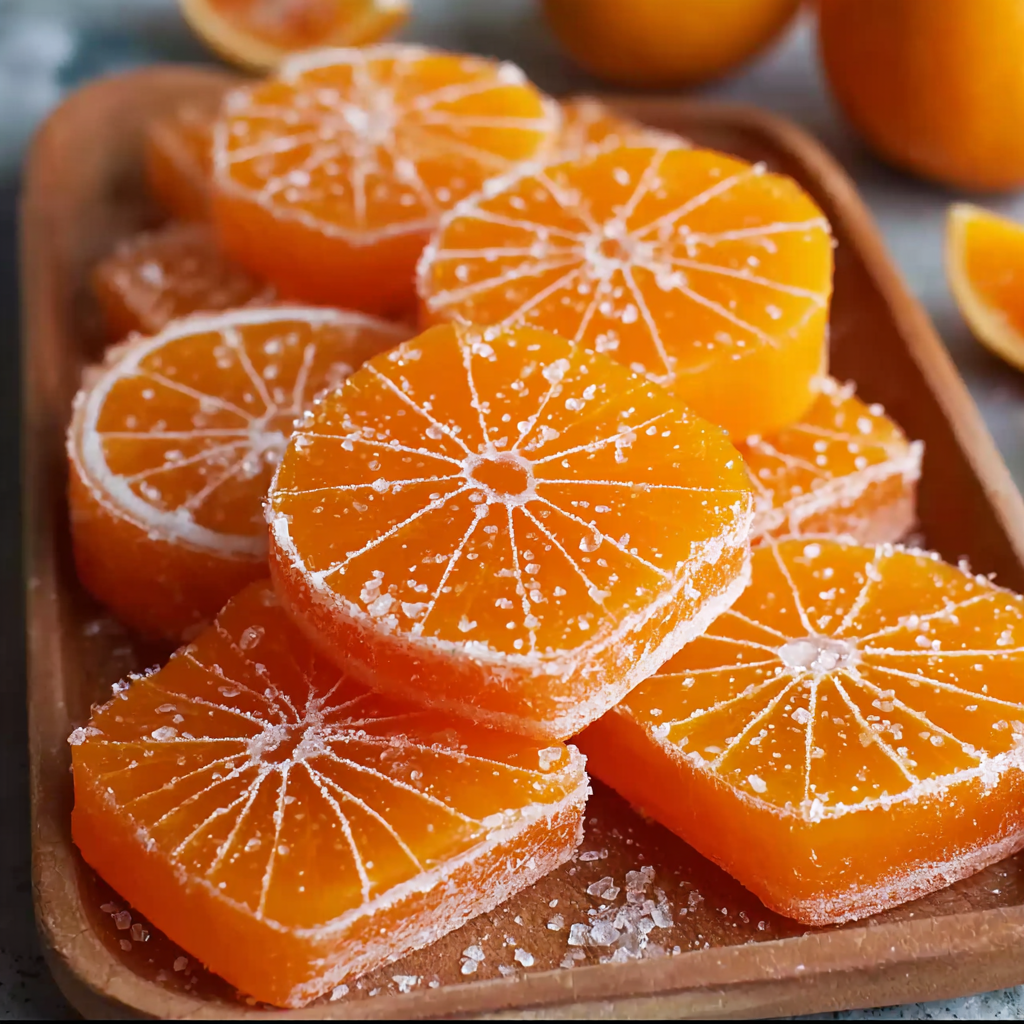
You Must Know
- Simmer gently: a vigorous boil will break the fruit; a gentle simmer allows syrup to penetrate without shredding the slices.
- Visual cue: look for translucence in the peel and glossy flesh — this tells you the candying is complete, usually between 45 and 60 minutes.
- Drying time varies: humidity changes how long they take to set; dry climates shorten the wait, while humid kitchens can require the full 48 hours.
- Optional finishes change shelf life: sugar-rolled slices store at room temperature, while chocolate-dipped slices are best refrigerated for a longer shelf life.
My favorite aspect is the slow conversion of a humble orange slice into a jewel-like candy. Once I started making these, I noticed guests lingering with tea and a small plate of oranges; they spark conversations because they look special but are easy to make. I often prepare two batches at different simmer times to compare texture and decide which my family prefers; it’s a small ritual that turned into a teaching moment about sugar work and patience in the kitchen.
Storage Tips
Store the slices in a single layer in an airtight container lined with parchment to prevent sticking. At room temperature they keep well for about two weeks; if you’ve dipped them in chocolate, refrigerate and consume within 2 to 3 weeks. For longer storage, freeze flat on a baking sheet, then transfer to a freezer-safe bag for up to three months. Reheat frozen slices briefly at room temperature before serving; avoid microwaving as it will make them soggy. Always check for sticky residue or off-odors as indicators of spoilage.
Ingredient Substitutions
If you can’t find small oranges or tangelos, use clementines, tangerines, or small navel oranges; larger oranges require more simmering and may yield slightly thicker peel. Swap part of the sugar with light corn syrup (up to 1/4 cup) if you worry about crystallization; this helps maintain a smooth syrup but slightly changes flavor. For a lower-sugar option, reduce simmer time to make a less-saturated candy — expect a chewier, less glossy result. If you prefer a different flavor profile, add a strip of vanilla bean to the syrup or a cinnamon stick for a warm note, removing aromatics before drying.
Serving Suggestions
Serve plain with tea or coffee for a bright palate cleanser, or present on a dessert board with nuts, dried fruits, and chocolates. For a refined finish, dip half in melted dark chocolate and let set on parchment, then sprinkle with a pinch of flaky sea salt. They make lovely additions to cocktails as a garnish or alongside citrus-forward cheesecakes and panna cotta. Package a few in small cellophane bags tied with twine for gifts; include a note indicating whether slices are chocolate-dipped and whether they were rolled in sugar.
Cultural Background
Candying citrus has a long tradition across Mediterranean and European kitchens where preserving fruit in sugar extends shelf life and concentrates flavor. Classic candied peels and slices have been used historically in baking, confections, and as festive treats during winter holidays. The method showcased here mirrors techniques used for candied citrus in Italian and French patisseries, where translucence and clarity indicate skill. These preserves celebrate the citrus harvest and are a simple way to create something luxurious from everyday fruit.
Meal Prep Tips
Make a double batch when citrus is inexpensive; the extra requires little active labor and can be dried on multiple racks. Plan around the drying time: start simmering in the evening and let them dry overnight or over two days while you carry on with other tasks. Use parchment-lined trays to speed cleanup and label containers with the date and finish type. Keep a small jar of extra granulated sugar on hand for quick rolling before gifting. For bulk gifting, layer slices between sheets of parchment in a box to prevent sticking.
These candied oranges are a small act of patience that rewards you with sophisticated, giftable sweets. They are cheerful, adaptable, and a great way to celebrate seasonal citrus — give them a try and make the recipe your own.
Pro Tips
Slice uniformly to 1/4 inch for even cooking and consistent texture.
Simmer at a very low heat to prevent the fruit from falling apart; gentle bubbles only.
Dry on a wire rack over a tray to allow airflow and catch drips, preventing sticking.
Roll in granulated sugar while tacky for a classic frosted finish and longer shelf life.
If dipping in chocolate, cool slices completely and pat any residual syrup before melting chocolate to avoid seizing.
This nourishing classic homemade orange candy recipe is sure to be a staple in your kitchen. Enjoy every moist, high protein slice — it is perfect for breakfast or as a wholesome snack any time.
FAQs about Recipes
Can I use a mandoline to slice the oranges?
Yes. Use a mandoline for consistent 1/4-inch slices, or a very sharp knife if you prefer more control. Uniform thickness ensures even cooking.
How do I know when the slices are candied?
Simmer gently until the peel becomes translucent and the flesh looks glossy; typically 45 to 60 minutes. Watch humidity during drying — up to 48 hours may be needed.
Tags
Classic Homemade Orange Candy
This Classic Homemade Orange Candy recipe makes perfectly juicy, tender, and flavorful steak every time! Serve with potatoes and a side salad for an unforgettable dinner in under 30 minutes.
Instructions
Slice the fruit
Trim the ends and slice oranges into 1/4-inch rounds using a sharp knife or mandoline. Aim for uniform thickness so all slices cook evenly.
Prepare the syrup
Combine 3 cups sugar and 3 cups water in a saucepan. Heat until sugar dissolves and the mixture reaches a gentle boil, then reduce to a low simmer.
Simmer the slices
Add slices in a single layer and simmer gently for 45 to 60 minutes, turning occasionally until the peel is translucent and the flesh is glossy.
Drain and dry
Remove slices with tongs and arrange on a wire rack over a baking sheet. Dry uncovered at room temperature for 24 to 48 hours until tacky but set.
Finish and store
Optionally roll in granulated sugar or dip in melted dark chocolate and sprinkle with flaky salt. Store in an airtight container at room temperature for up to two weeks.
Last Step: Please leave a rating and comment letting us know how you liked this recipe! This helps our business to thrive and continue providing free, high-quality recipes for you.
Nutrition
Did You Make This?
Leave a comment & rating below or tag
@yummyhues on social media!
Categories:
You might also like...
Air-Fried Rice Paper Noodle Rolls
Light, crisp rice paper rolls filled with vermicelli, tofu or shrimp and vibrant vegetables—air-fried to golden perfection for a healthy, speedy snack or appetizer.
Air Fryer Apple Fries
Crispy, lightly sweet apple sticks coated in panko and cinnamon, ready in minutes from the air fryer. A simple, family friendly snack or dessert.
Air Fryer Apple Fries
Crispy, cinnamon-kissed apple sticks air-fried to golden perfection — a quick snack that tastes like dessert, but feels delightfully fresh.
Did You Make This?
Leave a comment & rating below or tag @yummyhues on social media!
Rate This Recipe
Share This Recipe
Enjoyed this recipe? Share it with friends and family, and don't forget to leave a review!
Comments (1)
This recipe looks amazing! Can't wait to try it.
Comments are stored locally in your browser. Server comments are displayed alongside your local comments.
Hi, I'm Chloe!
What's Popular

30-Minute Meals!
Join to receive our email series which contains a round-up of some of our quick and easy family favorite recipes.