
Stovetop Turkish Flatbread (No Oven Needed)

Soft, pillowy Turkish-style flatbreads made entirely on the stovetop — perfect for quick meals, sandwiches, or to scoop up dips without heating an oven.
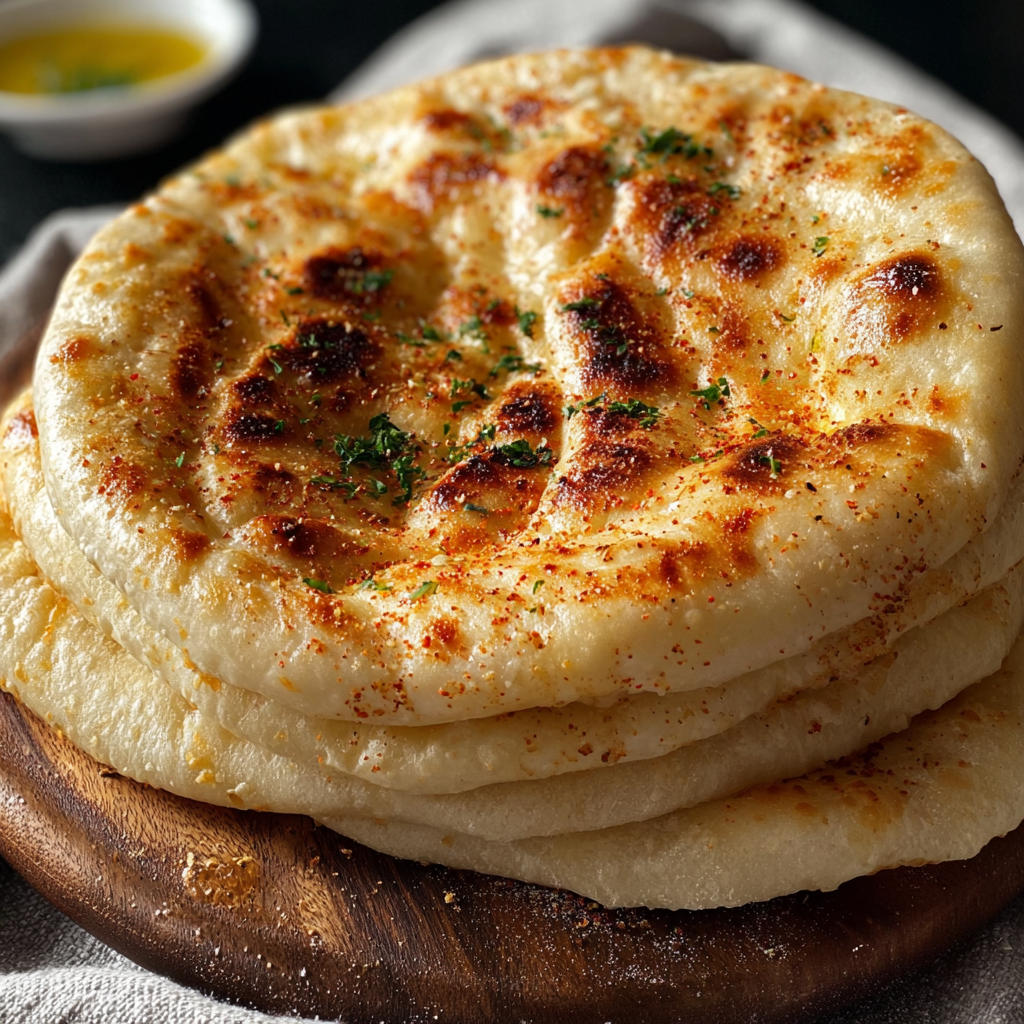
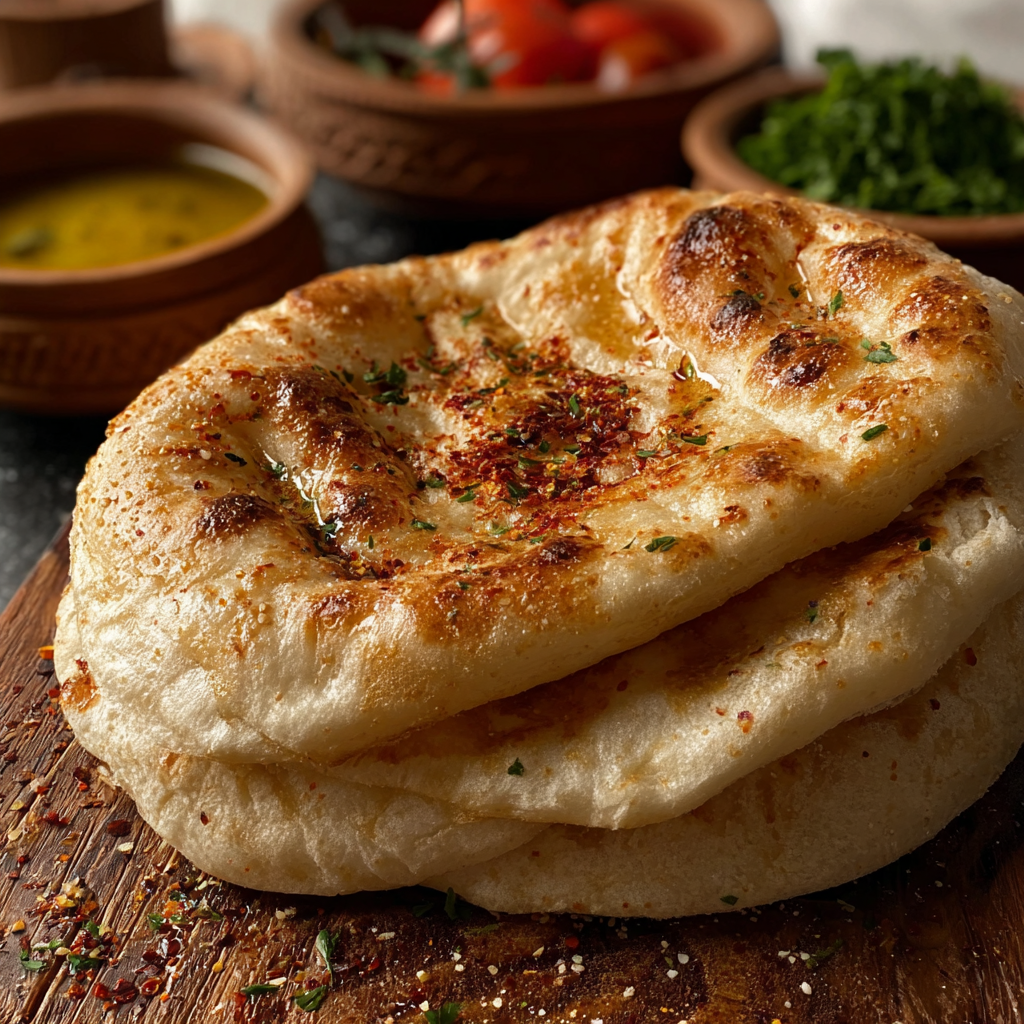
This stovetop Turkish flatbread has been my go-to when I want the warmth and comfort of freshly made bread without turning on the oven. I first learned this technique on a rainy afternoon when guests arrived unexpectedly and my oven was already in use. The result was a tender, slightly charred round with a soft interior that puffed like a small balloon when cooked correctly. It tastes faintly sweet from the quick yeast rise and has the delicate chew that makes it ideal for wraps and dipping.
What makes this version special is its simplicity and adaptability. With only pantry staples and a heavy skillet, you can produce six generous 7-inch rounds in under an hour of active work. The surface develops attractive bubbles and light brown blisters that give it that rustic look, while a final brush of melted butter or olive oil adds shine and aroma. This is the sort of bread that brings people to the table, invites conversation, and disappears faster than you expect.
Why You'll Love This Recipe
- Ready with about 20 minutes active work and a one hour proof, so it fits a busy afternoon or weekend brunch schedule.
- Uses simple pantry items: flour, yeast, warm liquids and salt; no special equipment required beyond a heavy pan.
- Stovetop method saves energy and keeps your kitchen cooler than using an oven, ideal for hot days.
- Produces soft, pillowy rounds that puff dramatically and hold fillings for sandwiches, shawarma, or mezze plates.
- Make-ahead friendly: dough can be refrigerated overnight for slower fermentation or shaped and frozen uncooked for future use.
- Customizable finish with butter, olive oil, garlic, or herbs for different flavor profiles.
On the day I discovered this technique my family gathered around the skillet, and the first puff made everyone laugh. My children called them 'little balloons' and insisted on watching each one rise. Since then I repeat this at family lunches; even picky eaters who avoid crusty bread love the soft texture. It also quickly became a favorite to serve with hummus and spicy tomato salad when friends pop by.
Ingredients
- Dough - Bread flour or all-purpose flour: Use 4 cups of strong bread flour for best chew and structure; King Arthur or any high-protein brand works well. All-purpose can be used for a softer crumb if preferred.
- Warm milk: 2/3 cup of milk warmed to about 100 to 110 degrees F helps create a tender crumb and richer flavor. Whole milk gives more softness but 2% will work.
- Warm water: 2/3 cup warm water at 100 to 110 degrees F to activate the yeast and create proper hydration for a supple dough.
- Instant dry yeast: 1 1/2 tablespoons of instant yeast provides a reliable quick rise. Fleischmann or SAF are both dependable choices.
- Sugar: 1 tablespoon to feed the yeast and provide a faint sweetness that improves browning and flavor.
- Salt: 3/4 tablespoon (about 2 1/2 teaspoons) for seasoning. Do not omit as it regulates fermentation and enhances taste.
- Topping (optional): 1 1/2 tablespoons melted unsalted butter or olive oil and chopped parsley for finishing. Butter gives richness, olive oil gives a Mediterranean character.
Instructions
Activate the yeast:Pour 2/3 cup warm milk and 2/3 cup warm water into a medium bowl. Stir in 1 tablespoon sugar and 1 1/2 tablespoons instant yeast. Let sit for 3 to 5 minutes until the surface looks slightly foamy. This shows the yeast is alive. If nothing happens after 10 minutes, start again with fresh yeast.Mix the dough:Add 4 cups flour and 3/4 tablespoon salt to the yeast liquid. Mix with a wooden spoon until the shaggy dough begins to come together. Bring the dough to the counter and knead by hand for 8 to 10 minutes until smooth and no longer sticky. The dough should be soft and slightly tacky but will pull away cleanly from your hands.First rise:Place the dough in a lightly oiled bowl, cover with plastic wrap or a damp towel, and let proof in a warm spot until doubled in size, about 1 hour. A warm oven with the light on works well as a proofing environment.Divide and rest:Punch the dough down gently and divide into six equal pieces. Shape each into a round ball and cover with a plastic bag or damp towel to rest for 10 to 15 minutes. Resting relaxes the gluten and makes rolling easier.Roll out to shape:On a lightly floured surface press each ball with a rolling pin into a round about 7 inches in diameter and 1/8 inch thick. Try to keep the thickness even so it cooks uniformly. If the dough springs back, rest it a few more minutes.Heat the pan and cook:Heat a heavy skillet or cast iron pan over medium heat. A thick-bottomed pan retains heat and promotes puffing; avoid very thin pans. Place one round in the dry pan. Cook until lots of bubbles form on the surface, about 1 to 2 minutes, then flip to cook the other side. When the bread puffs dramatically and blisters, reduce heat to low to allow internal cooking without burning the outside. Cover the skillet with a clean kitchen towel for 30 to 60 seconds to prevent drying.Finish and serve:Remove cooked rounds to a plate and brush with melted butter or olive oil if desired. Scatter chopped parsley over the warm bread for color and aroma. Serve immediately with fillings, dips, or alongside a mezze selection.
You Must Know
- This bread freezes well: layer cooled rounds with parchment and freeze up to 3 months. Reheat in a skillet for 1 to 2 minutes per side or briefly in a hot oven.
- High in carbohydrates and a good source of quick energy; each round is about 200 calories depending on size and toppings.
- Store at room temperature up to 24 hours in a sealed container, refrigerate up to 3 days. Reheat gently to restore softness.
- Avoid very high heat; the outside will char before the center cooks. Lowering the heat when the bread puffs ensures a soft interior.
My favorite aspect is the theatrical puffing. When one of these rounds inflates fully it is a small triumph, a reminder that simple techniques reward patience. Family members often gather to watch, compare blisters, and suggest toppings. Over time I have learned to tune the heat and rest times to our pan and stovetop, and it is gratifying to produce consistent rounds even on a weeknight.
Storage Tips
Cool the rounds completely before storing to prevent condensation. For short term keep in an airtight container or resealable bag at room temperature up to 24 hours. For longer storage stack with parchment between each round and refrigerate up to 3 days. For freezing, flash cool, then place parchment between rounds and freeze in a heavy-duty bag for up to 3 months. Reheat from frozen in a hot skillet for 1 to 2 minutes per side or wrap in foil and warm in a 350 degrees F oven for 6 to 8 minutes.
Ingredient Substitutions
Swaps are easy: use all-purpose flour for a softer, less chewy texture. Replace milk with extra water and a tablespoon of yogurt for tang and tenderness if you prefer dairy-free; for strict dairy-free use olive oil instead of butter for finishing. For a whole wheat version substitute up to half the flour with whole wheat and increase hydration by 1 to 2 tablespoons as whole wheat absorbs more liquid. If you do not have instant yeast, use active dry yeast at 1 3/4 tablespoons and proof it in the warm liquid for 10 minutes until foamy.
Serving Suggestions
Serve warm with hummus, baba ganoush, grilled vegetables, or as a wrap for spiced meats and salads. For breakfast split and fill with scrambled eggs, feta and herbs. Garnish with zaatar and olive oil for a classic Middle Eastern touch or rub with garlic butter and lemon for bright flavor. These rounds also accompany soups and stews well, perfect for sopping up brothy sauces.
Cultural Background
Flatbreads are central to Turkish cuisine and the eastern Mediterranean. These stovetop rounds are inspired by traditional breads like bazlama, a fluffy griddle bread commonly cooked in village kitchens without ovens. Historically, such breads were made on cast iron griddles or over open flames and served fresh for every meal, illustrating the importance of bread as a daily staple in the region.
Seasonal Adaptations
In spring and summer use olive oil and fresh chopped herbs like dill and parsley on top, or serve with tomatoes and cucumbers for a light pairing. In colder months add a tablespoon of olive oil to the dough for extra richness and serve alongside hearty stews or lamb dishes. For holiday gatherings, brush with butter and sprinkle nigella or sesame seeds for a festive look.
Meal Prep Tips
Make the dough the night before and refrigerate for a slow ferment that improves flavor. Divide and shape the rounds when ready to cook. Alternatively, cook a batch and freeze the cooled rounds; reheating in a skillet restores texture better than microwaving. For packed lunches warm and wrap in foil to keep soft for a few hours.
There is something quietly satisfying about pulling a warm round from the pan and brushing it with butter while it steams. Share these with friends or keep them for weeknight dinners; they always make the meal feel a little more special.
Pro Tips
Use a heavy skillet or cast iron for the best heat retention and even puffing.
If dough resists rolling, let it rest 5 to 10 minutes to relax the gluten.
Lower the heat once the bread has puffed to finish cooking without burning the exterior.
Brush with olive oil instead of butter to keep dairy-free servings.
This nourishing stovetop turkish flatbread (no oven needed) recipe is sure to be a staple in your kitchen. Enjoy every moist, high protein slice — it is perfect for breakfast or as a wholesome snack any time.
Tags
Stovetop Turkish Flatbread (No Oven Needed)
This Stovetop Turkish Flatbread (No Oven Needed) recipe makes perfectly juicy, tender, and flavorful steak every time! Serve with potatoes and a side salad for an unforgettable dinner in under 30 minutes.
Ingredients
Dough
Topping (optional)
Instructions
Activate the yeast
Combine warm milk, warm water, sugar and instant yeast and let sit for 3 to 5 minutes until slightly foamy to confirm yeast activity.
Mix and knead
Add flour and salt, mix until a shaggy dough forms, then knead by hand for 8 to 10 minutes until smooth and slightly tacky.
First rise
Place dough in an oiled bowl, cover and proof in a warm place until doubled in size, about 1 hour.
Divide and rest
Punch down the dough, divide into six pieces, shape into rounds and rest covered for 10 to 15 minutes.
Roll out
Roll each round into a 7-inch disk about 1/8 inch thick on a lightly floured surface.
Cook on stovetop
Heat a heavy skillet over medium, cook each round 1 to 2 minutes per side until lots of bubbles appear and the bread blisters and puffs; reduce heat to low if the exterior darkens too quickly.
Cover briefly
Cover the skillet with a clean towel or lid for 30 to 60 seconds after puffing to keep bread soft while finishing.
Finish and serve
Brush warm rounds with melted butter or olive oil, sprinkle chopped parsley and serve immediately.
Last Step: Please leave a rating and comment letting us know how you liked this recipe! This helps our business to thrive and continue providing free, high-quality recipes for you.
Nutrition
Did You Make This?
Leave a comment & rating below or tag
@yummyhues on social media!
Categories:
You might also like...
Air-Fried Rice Paper Noodle Rolls
Light, crisp rice paper rolls filled with vermicelli, tofu or shrimp and vibrant vegetables—air-fried to golden perfection for a healthy, speedy snack or appetizer.

Air Fryer Apple Fries
Crispy, lightly sweet apple sticks coated in panko and cinnamon, ready in minutes from the air fryer. A simple, family friendly snack or dessert.
Air Fryer Apple Fries
Crispy, cinnamon-kissed apple sticks air-fried to golden perfection — a quick snack that tastes like dessert, but feels delightfully fresh.
Did You Make This?
Leave a comment & rating below or tag @yummyhues on social media!
Rate This Recipe
Share This Recipe
Enjoyed this recipe? Share it with friends and family, and don't forget to leave a review!
Comments (1)
This recipe looks amazing! Can't wait to try it.
Comments are stored locally in your browser. Server comments are displayed alongside your local comments.
Hi, I'm Chloe!
What's Popular

30-Minute Meals!
Join to receive our email series which contains a round-up of some of our quick and easy family favorite recipes.